
Monday, October 25, 2010
Volunteer for Your Community and Meet Some Celebrities
The United Way will soon be seeking volunteers to work for the Celebrity Classic Golf Tournament. If you want to help out in your community and are looking for a fun and exciting way, this could be a great opportunity for you.
The Celebrity Classic has hosted some big name celebrities, such as Samuel L. Jackson. It is a weekend of fun, benefiting the United Way of Hays County. Volunteers of all types are needed for a variety of different roles. Below are some of the ways that you can get involved.
Golf Event VolunteersVolunteer opportunities for the golf events will be grouped by task and are needed for every aspect of the event including:· Caddies· Scorekeepers· Assembly/Teardown· Administrative Staff· General Concierges
Reception Volunteers There are a variety of opportunities for the receptions as well, including:· Wait-staff· Food/Drink Servers· Assembly/Teardown· Administrative Staff· General Concierges
Specialty VolunteersThe United Way of Hays County can always use help in different areas. If you have a special skill that you would like to use to contribute to your community, contact us and we will work with you. Some popular areas of specialized skills that we are in need of include:· Web development· Surveying/Statistics· Language Skills· Writing Skills
We look forward to hearing from you soon.
The United Way of Hays County
Monday, October 25, 2010
Difference between par and birdie
The Pitch Shot
The most feared shot in golf is not necessarily the hardest shot. Often, it is just the least practice. Too many times we are too quick to go to the driving range and swing the woods the entire time we are there. However, when asked what wins more games than any other skill, most pros will tell you that it is the pitch shot. So, below we will walk you through the art of perfecting the pitch shot.Step One: Stance
Start with your legs shoulder-length apart, with your knees slightly bent. This will provide you with a solid base and allow for some stability. Your weight will be on your back foot and the clubface will be open, both of which will help you achieve more loft on your shot.
Step Two: Deciding the Distance
You should start each pitch shot with assessing the distance desired from the shot. You should then use the 7-8-9 method to apply the desired force to get the ball there, but you must decide before you start your swing.
Step Three: Understand Your Swing
The key to a pitch shot is consistency. Little differences in your shot will make a big difference. Therefore, if you guess the distance that you need and then try to swing with the appropriate strength, there is too much uncertainty in your shot and it will be difficult to be consistent. So how do you become consistent? To answer that you must first understand how your swing works.
When you begin to swing, your club is not moving at all. Then, when you are swinging your arms and applying muscle pressure, the club is accelerating until it reaches its maximum speed. The speed at which the club is traveling when it makes contact with the ball will determine how far the ball goes. This is important to understand because guessing with your strength is not only hard to do, but unnecessary.
If you want to adjust the distance of the shot while hitting the ball with the same force each time, all you have t do is adjust the amount of time that the club is accelerating. The longer the club is accelerating, the faster it will be travelling when it hits the ball and the further the shot. The beauty in doing this is that you swing the club just as hard, whether you are shooting 10 yards or 60 yards.
Step Four: The 7-8-9 Method
The 7-8-9 Method uses an imaginary clock to guide how far you backswing on a particular shot. You will then divide your shots into three categories: the 7 range, the 8 range and the 9 range. The 7 range will be your shortest shot. With your arms starting straight downward (6 o’clock position) your arms will go just barely backward until pointing to 7 o’clock. Likewise, the 8 range will be with your arms going back to 8 o’clock and the 9 range will be with your arms going back to 9 o’clock. During the process of the backswing you will cock your wrist to a 90 degree angle and un-cock your wrist during the swing. Below is a diagram, courtesy of My First Golf Book, showing what the full 9 range swing looks like.

Once you have practiced each of these swings, you will begin to get an idea of how far the ball will travel for each shot. This way your shots will become consistent every time and you will hit the green in the correct place every time.
Step Five: The Follow-Through
After you have selected your shot and have begun your swing, slowly shift your weight to your front foot and continue to bend the wrist through the shot. Follow through the ball and continue your swing until your arms are in the 3 o’clock position, regardless of which shot type you are using. This will allow for smooth, even contact between the club and the ball, which will reduce the possibility of errors.
From here it is smooth sailing, and you should be able to putt your way to victory.
Monday, October 18, 2010
Getting to Know the Courses
Onion Creek Edition
Onion Creek is one of the most fun and challenging courses in Austin, and one of the three courses that we will be playing on during the tournament. There is a major vertical component to this course which makes it both very difficult to select clubs and a lot of fun when you are successful. Straight shooting is the key to this course because there are trees lining almost every hole. Below are some suggestions as to how we would approach the holes.
Hole #1 (Par 5, 516 yards)
The first hole is a dogleg right with a slightly uphill approach shot. Avoid the bunkers on the left off of the tee box. Then, layup on the left side of the fairway to give you a good angle to the small elevated green.
The first hole is a dogleg right with a slightly uphill approach shot. Avoid the bunkers on the left off of the tee box. Then, layup on the left side of the fairway to give you a good angle to the small elevated green.
Hole #2 (Par 3, 131 yards)
The second hole is a downhill approach tee shot to a very uneven green. Short hole so it should be easy to tee to the green, but be careful where you land on the green. Make sure to stay on the same level as the hole or expect a very challenging putt. Take one less club.
The second hole is a downhill approach tee shot to a very uneven green. Short hole so it should be easy to tee to the green, but be careful where you land on the green. Make sure to stay on the same level as the hole or expect a very challenging putt. Take one less club.
Hole #3 (Par 3, 337 yards)
Short but very tight par 4, out of bounds left, creek on left side. It is important to get the ball in the fairway off the tee to avoid penalty strokes. The green has a deep slope from left to right.
Short but very tight par 4, out of bounds left, creek on left side. It is important to get the ball in the fairway off the tee to avoid penalty strokes. The green has a deep slope from left to right.
Hole #4 (Par 4, 414 yards)
Straight away par 4. There is a creek down the right side that must be avoided. The second shot will be an approach shot to an elevated green, again with lots of slope.
Straight away par 4. There is a creek down the right side that must be avoided. The second shot will be an approach shot to an elevated green, again with lots of slope.
Hole #5 (Par 4, 418 yards)
Slightly bent straight away par 4 with left side of the fairway guarded with bunkers. The tee off is essential to this hole because the approach shot is going to be very difficult. The green that is guarded by water on the left and bunkers on the right.
Slightly bent straight away par 4 with left side of the fairway guarded with bunkers. The tee off is essential to this hole because the approach shot is going to be very difficult. The green that is guarded by water on the left and bunkers on the right.
Hole #6 (Par 3, 161 yards)
Slightly bent medium range par 3 with a bunker guarding the right side. Huge green that has lots of slope, requiring a very accurate approach shot.
Slightly bent medium range par 3 with a bunker guarding the right side. Huge green that has lots of slope, requiring a very accurate approach shot.
Hole #7 (Par 5, 601 yards)
Longest hole on the course, with a long narrow dogleg left. Avoid the trees off the tee. You will definitely want to lay up, preferably down the right side to set up a sold approach.
Longest hole on the course, with a long narrow dogleg left. Avoid the trees off the tee. You will definitely want to lay up, preferably down the right side to set up a sold approach.
Hole #8 (Par 3, 205 yards)
Long for a par 3, and guarded by bunkers on the left. The plus side is that it has a relatively flat green, which are hard to come by on this course..
Long for a par 3, and guarded by bunkers on the left. The plus side is that it has a relatively flat green, which are hard to come by on this course..
Hole #9 (Par 4, 375 yards)
Straight away par 4. Avoid the bunkers on the left and the water on the right. An accurate drive is required to avoid the bunkers on the left and the water on the right. Long green sloping from the back to front allows you to club-up and let it roll back.
Straight away par 4. Avoid the bunkers on the left and the water on the right. An accurate drive is required to avoid the bunkers on the left and the water on the right. Long green sloping from the back to front allows you to club-up and let it roll back.
Hole #10 (Par 4, 343 yards)
The first hole of the back 9 is a medium length uphill par 4. Avoid the fairway bunker on the right side. Approach shot to a slightly uphill small green protected by a bunker on the front left.
The first hole of the back 9 is a medium length uphill par 4. Avoid the fairway bunker on the right side. Approach shot to a slightly uphill small green protected by a bunker on the front left.
Hole #11 (Par 3, 219 yards)
Hole #11 is a long downhill par 3. Avoid the bunker on the left. Very forgiving green sloping from back to front.
Hole #11 is a long downhill par 3. Avoid the bunker on the left. Very forgiving green sloping from back to front.
Hole #12 (Par 5, 577 yards)
Long straight away par 5. Very forgiving fairway. Lay up to your yardage. Approach shot to a long skinny green protected by bunkers in front left and right.
Long straight away par 5. Very forgiving fairway. Lay up to your yardage. Approach shot to a long skinny green protected by bunkers in front left and right.
Hole #13 (Par 3, 178 yards)
Medium length par 3 to uphill green. Avoid greenside bunkers. Take one more club.
Medium length par 3 to uphill green. Avoid greenside bunkers. Take one more club.
Hole #14 (Par 4, 424 yards)
Straight away par 4. Favor the right side of the fairway to avoid the tree guarding left. Approach shot to a forgiving green protected by bunkers on the right and the back.
Straight away par 4. Favor the right side of the fairway to avoid the tree guarding left. Approach shot to a forgiving green protected by bunkers on the right and the back.
Hole #15 (Par 4, 414 yards)
Slightly angled, and most challenging hole on the golf course. Dogleg right par 4. Fairway protected by trees on right and left. Approach shot over a ravine to a slightly elevated green sloping from back to front.
Slightly angled, and most challenging hole on the golf course. Dogleg right par 4. Fairway protected by trees on right and left. Approach shot over a ravine to a slightly elevated green sloping from back to front.
Hole #16 (Par 4, 386 yards)
Short downhill dogleg left par 4. Favor the right side off the tee to setup approach shot to a well protected green.
Short downhill dogleg left par 4. Favor the right side off the tee to setup approach shot to a well protected green.
Hole #17 (Par 3, 144 yards)
Short uphill par 4. Green divided by big tier in the middle.
Short uphill par 4. Green divided by big tier in the middle.
Hole #18 (Par 5, 558 yards)
Great finishing par 5. Avoid fairway bunkers off the tee. Layup to your yardage. Demanding approach shot to very elevated narrow green protected by bunkers on both sides.
Great finishing par 5. Avoid fairway bunkers off the tee. Layup to your yardage. Demanding approach shot to very elevated narrow green protected by bunkers on both sides.
Monday, October 11, 2010
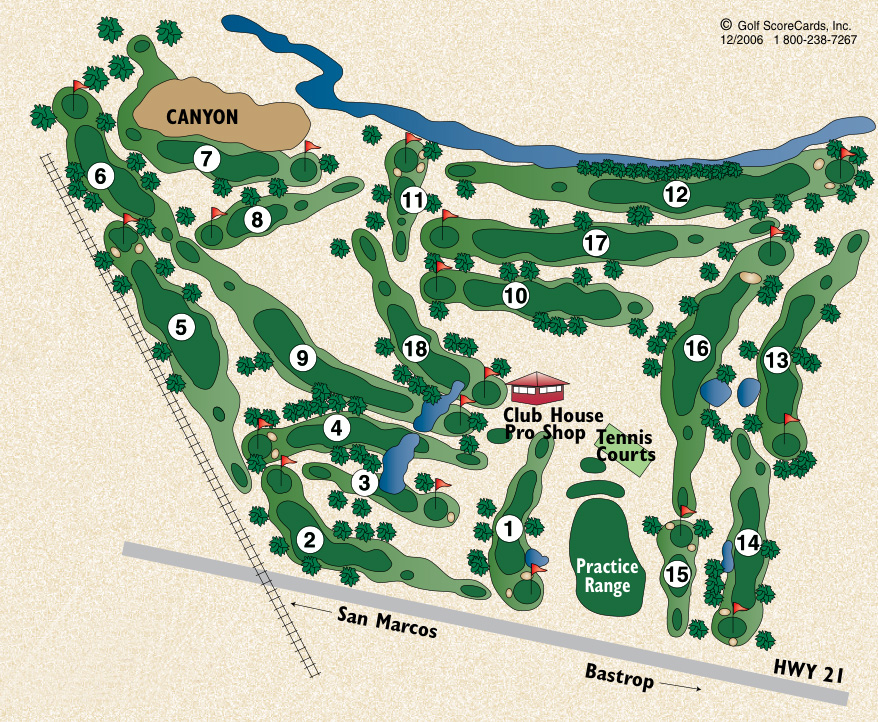
Quail Creek Edition
As we begin to prepare for next year’s tournament, one theme keeps coming to mind. Luck will favor the well-prepared. With that in mind, we have created a little homework for you to look over the courses that you will be playing on with the celebrities. This is the Quail Creek golf course in San Marcos, along with a breakdown of how to play each hole. Best of luck.
Hole #1 (Par 4, 323 yards)
Hole #1 is a dogleg left, starting from the Pro Shop. Bring as much power as possible off the tee, as the dogleg is slight and there is enough fairway to muscle-up. From there a mid-range iron stroke should put you on the green. Beware of a water hazard and sand trap to the left of the fairway just before the green and a sand trap just to the right of the green.
Hole #2 (Par 4, 409 yards)
Hole #2 is a dog-leg right. Because the bend is late in the hole, there is room to give decent power from the tee, though not major distance. Though the hole is a little longer than the first hole but there are no hazards, so don’t be afraid to sacrifice a little accuracy for some added power. Whatever you do, DO NOT try to jump the dogleg.
Hole #3 (Par 3, 181 yards)
Accuracy is the key to this short hole. A solid stroke from a lower-numbered iron, or hybrid, should leave you in good shape. Watch out for the water hazard mid-fairway on the left and a sand trap just behind the green.
Hole #4 (Par 4, 315 yards)
Hole #4 is a slight dogleg left with some major hazards involved. Tee off with a driver or wood to ensure that you clear the water hazard towards the beginning of the fairway (Beginners can lay-up if power is a concern). From there, stay in the lower-numbered iron area to get to the green. Aim for the back of the green, both because that is where the current pin-placement is and because you have to avoid the two sand traps at the front of the green.
Hole #5 (Par 5, 587 yards)
Do not let the distance intimidate you. Though it is a long hole, the fairway widens at the center to give you some wiggle room for those all-or-nothing tee shots. Most golfers will need to lay-up on the end of the fairway before shooting for the green, which is a very good idea if you are looking to avoid the two sand traps in front of the green (and I am betting that you are).
Hole #6 (Par 4, 363 yards)
Hole #6 is just your everyday par 4, with nothing fancy. With only medium range distance, no real dogleg to speak of and no hazards, this is where birdies are born. Muscle-up from the start and get there in as few strokes as possible. Not a whole lot more to say about that.
Hole #7 (Par 4, 403 yards)
Stay right… because there is a canyon there. There are, however, no hazards on the opposite side so don’t be afraid to stay right. The hole is only medium length, with no dogleg, so as long as you stay right you should be ok. Did I mention that you need to stay right?
Hole #8 (Par 3, 233 yards)
Hole #8 is a fairly long for a par 3, but there is no dogleg or hazards. If you have the accuracy, shoot for green. Otherwise, lay-up and take a well placed second shot.
Hole #9 (Par 5, 502 yards)
Hole #9 has some distance to it. There will definitely be three shots before you reach the green. Though a solid tee shot could tempt you to shoot for green in two, resist the urge. The water hazard before the green has claimed way more than its fair share of balls. Be smart and lay-up.
Hole #10 (Par 4, 433 yards)
The first hole of the back 9 is short for a par 4 and straight, with no hazards. If hole #6 was kind to you, there is no reason that hole #10 shouldn’t be as well.
Hole #11 (Par 3, 200 yards)
This is an average-sized par three. Aim slightly right and an amateur’s drive should creep onto the green. Watch out for the three sand traps, one at front-left and two at the right.
Hole #12 (Par 5, 566 yards)
This is a very long hole. Distance and accuracy are equally important, as the fairway is long and thin. If you have a tendency to majorly slice left, you may have some problems with the canal that runs on the other side of the tree line. Otherwise, keep your shots straight while trying to maximize distance and you should be ok. I don’t have to tell you to lay-up because the distance should do that for me. Beware of two sand traps at either side of the front of the green.
Hole #13 (Par 4, 464 yards)
On hole #13 we are re-introduced to the dogleg. Power-up off of the tee to setup for a solid second stroke. Watch out for the water hazard midway down the fairway on the right, though the location makes it little trouble for most golfers.
Hole #14 (Par 4, 400 yards)
Hole #14 is a very slight dogleg right with a water hazard halfway down the fairway on the right. To avoid this hazard let your ball go straight, and ignore the dogleg. This should land you on the left side of the green, with good position for a second shot. Treat this hole with some caution and it very well could reward you with your third birdie of the day.
Hole #15 (Par 3, 195 yards)
There is not much distance on this whole but some hazards that could cause some problems. Watch out for the sand traps in front of and behind the green. Take the two-iron off of the tee, in place of the woods or driver. The extra loft should give you some wiggle-room on accuracy by reducing roll.
Hole #16 (Par 5, 561 yards)
This hole is long, doglegged, and hazardous. Tee off straight, ignoring the dogleg to avoid the water hazard to the right, and with as much power as possible. Lay-up with the second shot. Do not try to go for green on the second shot because the bunker at the end of the fairway, followed by a rough patch, can easily snatch up your ball.
Hole #17 (Par 4, 432 yards)
This hole is straight with no hazards. Give it as much power as you can, while keeping it straight. Then repeat. Two good shots could leave you in good position for birdie or par.
Hole #18 (Par 4, 439 yards)
One this slight dogleg right, the fairway opens up so give it some muscle. If you have been waiting the entire round to jump a dogleg, this is it. There is a hazard at the end of the fairway to the right. If you are able to about that you should be able to finish strong.

Monday, October 4, 2010
Celebrity Classic Golf Basics
(Presented by the United Way of Hays County)
You do not have to be a professional golfer to enjoy a weekend of celebrity golf. In fact, the tournament is open and welcoming to golfers of all skill levels. The main goal of the tournament is to have a great weekend with the celebrities and raise money for a good cause in the process. That being said, we have assembled a group of online videos designed to help beginners learn the basics of how to play the game, in order to get ready for the big event. If you have never played before, or are still starting out, we still have a little over 8 months. With a little practice, and some a few basic principles, you should be shooting for birdie in no time.
The Art of Driving
Swinging the Irons
Pitching: As Important in Golf as in Baseball
Chipping onto the Green
Shooting From the Bunker
Putting: the Finishing Touch